I’ve decided to post my first tutorial today. My inspiration derived from a friend of mine who was looking for a tut similar to this one. I hope I meet the required guidelines to make this a successful tut.
I’m going to give you step-by-step instructions on how to create an etched effect using photoshop. It’s quick and easy and should take about ten minutes to do. Click on any image to enlarge them for better viewing.
Step 1- Open a new document and set your desired width, height, and resolution. Since mine is for a header for a webpage, my settings will be 1000px by 288px with a resolution of 72.
Step 2- Choose the background you want to use and duplicate it. I’ve chosen a nice fabric that I want to put my text on top of. You want your image or text to look as if has been etched in the fabric. So using the same background for your design as you use for your image will give it a more realistic look.
Step 3- Select the original background layer and make it slightly darker than the copy. I used a levels adjustment layer and darkened the image. Change the midtone adjustment slider from 1
to .50.
And this is what you should have so far:
Step 4- Choose the image or text you want to place on top of your background. Place it on the background copy and not the original. I chose a Stone Sans font, but it’s really your preference. It doesn’t matter what color you chose either.
Step 5- Now that your image is placed, Command+click on the text thumbnail to make a selection.
Step 6- Turn off the visibility of the text. The marching ants will still be visible.
Step 7- Select the layer with the background copy. Hold the Alt key and click the layer mask. That way, just your text selection will be masked and not the entire layer.
Step 8- It’s time to add a layer style to the masked layer. Add a bevel and emboss using the settings below or to your desired preference. I used an outer bevel, chiseled hard with a depth of 1000.
Step 9- Add a drop shadow to the layer style. Take the opacity down to about 50%. Give it a distance of 7, a spread of 6, and a size of about 5. Again, this is decided based on your preference.
Step 10- Click ok and your done.
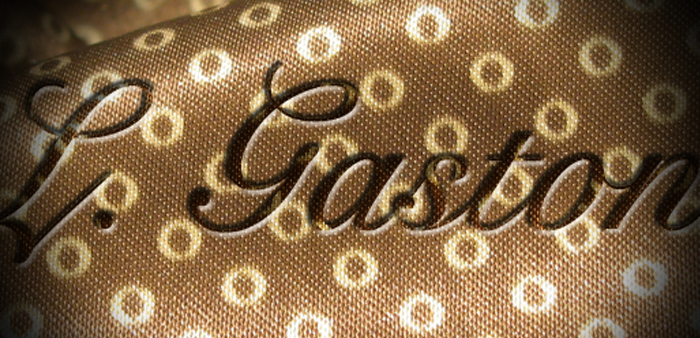
This also works with script fonts as well. I created this image below using a Snell Roundhand and instead of using outer bevel, I used an inner bevel with the same settings. Inner bevel widens the image.
That’s it. I hope this tutorial has helped someone and I hope you enjoyed it.